Wednesday, April 5, 2017

Iframe communication or Accessing a cross-origin frame

Accessing a cross-origin frame.

window.postMessage allows you to send messages not only across frames (regular frame or iframe) but also across domains. This post showed interaction from parent to child. Even when we keep the iframe domain url is different for the main page url.
With out using the window.postMessage will gives us below error message in console

SecurityError: Blocked a frame with origin from accessing a cross-origin frame

You can't access an iframe with Javascript, it would be a huge security flaw if you could do it.
For the same-origin policy browsers block scripts trying to access a frame with a different origin.
Origin is considered different if at least one of the following parts of the address isn't maintained: ://:/path/to/page.html Protocol, hostname and port must be the same of your domain, if you want to access a frame.


Examples
Here's what would happen trying to access the following URLs from http://www.example.com/home/index.html

URL RESULT
http://www.example.com/home/other.html -> Success
http://www.example.com/dir/inner/another.php -> Success
http://www.example.com:80 -> Success (default port for HTTP)
http://www.example.com:2251 -> Failure: different port
http://data.example.com/dir/other.html -> Failure: different hostname
https://www.example.com/home/index.html.html -> Failure: different protocol
ftp://www.example.com:21 -> Failure: different protocol & port
https://google.com/search?q=james+bond -> Failure: different hostname & protocol
Workaround

Monday, April 3, 2017

Get Google contacts with Javascript using Google Contacts API and OAUTH 2.0

To get the Google Contacts with Javascript using Google Contacts Api

To Pull the google contacts we need to create a project in google developer console

Create a Google application in Google Developers Console for obtaining your Client id and Client secret

  • Go to Google Google Developers Console and login with your google account.
  • create one a project by clicking Create Project Button
  • Go into the newly created project
  • Click On the Menu icon and select the Api Manager Link
  • Search for “Contacts API” and click on it
  • Enable the “Contacts API” by hitting the “Enable API” button
Below is the code to pull the contacts from google relplace client id with newly created client id

Friday, March 31, 2017

Deploy files or directory hierarchies to a server using Grunt and ppk file


Grunt Sftp Deployment using ppk file

Add Grunt sftp-deploy plugin using below command

npm install grunt-sftp-deploy

Create the Gruntfile.js


Create the .ftppass The below file will contains the server connection details

With any luck, you will get a sweet deployment result like this after enter the below command
$ grunt sftp-deploy:build
>> Logging in with key at E:/credentials/keys/serverkey.ppk
>> Concurrency : 4
transferred=[1/3] elapsed=[0.0s] overall=[33%] eta=[0.0s] [====== ]
>> Directories done.
transferred=[2/3] elapsed=[0.7s] overall=[67%] eta=[0.4s] [============ ]
>> Transferred : 0 Mb
Done, without errors.

Wednesday, February 8, 2017

GUI version control for Linux system

RabbitVCS 

TortoiseSVN alternative for Linux is RabbitVCS.  

Install RabbitVCS in Ubuntu

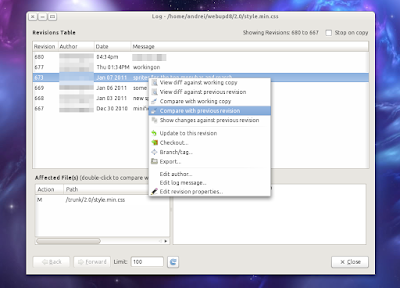
RabbitVCS screenshot

Sure, you can always work with SVN repositories from the command line but sometimes a graphical SVN client is more convenient - for example you can use it to check which files are not added to the repository yet. And when it comes to graphical SVN clients, I'm sure most of you will agree when I say that RabbitVCS, a "set of graphical tools written to provide simple and straightforward access to the version control systems you use" inspired by the famous TortoiseSVN, is probably the best such tool for Linux.


RabbitVCS gedit
(RabbitVCS Gedit plugin)


Not just for SVN / Nautilus


RabbitVCS has most of the TortoiseSVN features and nicely integrates into the GNOME desktop thanks to a Nautilus Extension and a Gedit plugin for easy access to everything you need. Further more, even though its main page doesn't mention this, RabbitVCS is not just for Nautilus / SVN! It works with GIT (starting with version 0.14, released on January 4th, 2011) too and it also has a Thunar plugin so you can use it under XFCE too.


RabbitVCS


Those of you who haven't tried Rabbitvcs lately will be glad to know that since version 0.14.1.1 things became quite stable and Nautilus now stays responsive while the plugin checks for changes in the background. In fact, the v0.14 release cycle ended and the RabbitVCS developer posted a roadmap for the v0.15 cycle which includes: recursive/async status monitor for Nautilus, RabbitVCS menu items and emblems to the Gedit file browser plugin and refactor VCS abstraction code to make it easier to add new VCSs and UIs. He needs some help with all this so if you can, help him out!


Install RabbitVCS in Ubuntu

1. Add the RabbitVCS Ubuntu PPA:
sudo add-apt-repository ppa:rabbitvcs/ppa && sudo apt-get update

2. Install RabbitVCS:

- For Nautilus 2:
sudo apt-get install rabbitvcs-core rabbitvcs-nautilus rabbitvcs-cli

- For Nautilus 3 (Ubuntu 11.10, 12.04):
sudo apt-get install rabbitvcs-core rabbitvcs-nautilus3 rabbitvcs-cli


- For Thunar:
sudo apt-get install rabbitvcs-core rabbitvcs-cli rabbitvcs-thunar

Once installed, restart Nautilus / Thunar (for Nautilus, type "nautilus -q" in a terminal).


Optional: If you also want to install the RabbitVCS Gedit extension, use the following command:
sudo apt-get install rabbitvcs-gedit


Friday, February 3, 2017

Check Mod Rewrite Enabled or not in Apache

To check either mod rewrite enabled or not in Apache

Check mod rewrite is enabled or not

1. Create sample.php file in localhost root folder with below content

print_r(apache_get_modules());

output check for mod_rewrite

2.To check .htaccess is working keep the below code in .htaccess
RewriteEngine On
RewriteRule ^.*$ test.php 

REMOTE DEBUGGING ON IOS for Ios APACHE CORDOVA and mobile webpages

Safari Remote Debug Tool


This tutorial will show you how to remotely debug your cordova app on iOS using the safari remote debug tool to inspect the java script errors .

Enable Debugging on Desktop side

First, you need to enable Safari Develop menu in Safari desktop. 
Go to Safari > Preferences and ensure the Show Develop menu in menu bar check box is checked.


Enable Debug Mode on Mobile

Now, you need to enable Web Inspector in the advanced Safari Settings of your iOS Device. Go to Settings > Safari > Advanced and enable Web Inspector.


Inspect with Safari


Now we're finally able to remotely debug our cordova webview with Safari. First, launch your app on your iOS device connected to the computer via USB. 

In Safari desktop, Go to Develop > Your iPad/iPhone > Index.html.


That's it! Now you should be able to debug your app like any other website!


Debug JavaScript Step by Step

Exactly like you would do on any website, you can remotely debug step by step your JavaScript code in the Safari Web Inspector.


Wednesday, January 25, 2017

Firebase cloud messaging Push Notification for Websites (fcm)

Getting a Configuration File


FCM FLOW
FCM FLOW


  • Now put your app name and select your country.


  • Now click on Add Firebase to Your Android App.
  • Write some code for registering the service worker
    • index.html 
      • this file is responsible to subscribe the user devices and sends the device tokens to server.
include below js file: https://www.gstatic.com/firebasejs/3.6.2/firebase.js add below script code in script tag:
 var config = {
            apiKey: "AIzaSyDaY7_6yfeMbXIQNLgrLa3n_IqweQ",
                    authDomain: "push-a1eaa.firebaseapp.com",
                    databaseURL: "https://push-a1eaa.firebaseio.com",
                    storageBucket: "push-a3eaa.appspot.com",
                    messagingSenderId: "3490973264967"
            };
            firebase.initializeApp(config);


            const messaging = firebase.messaging();
            messaging.requestPermission()
                    .then(function () {
                    console.log('Have permission');
                    return messaging.getToken();
                    })
                    .then(function (token) {
                    document.getElementById("bigone").innerHTML = token;
                    console.log(token);
                    })
                    .catch(function (err) {
                    console.log('Unable to get permission to notify.', err);
                    });


            messaging.onMessage(function (payload) {
            
            console.log("Message received. ", payload);
            });
 
    • firebase-messaging-sw.js
      include two files : https://www.gstatic.com/firebasejs/3.5.2/firebase-app.js https://www.gstatic.com/firebasejs/3.5.2/firebase-messaging.js
      // Initialize the Firebase app in the service worker by passing in the
      // messagingSenderId.
      firebase.initializeApp({
        'messagingSenderId': '3490973264967'
      });
      
      // Retrieve an instance of Firebase Messaging so that it can handle background
      // messages.
      const messaging = firebase.messaging();
       
      
      // If you would like to customize notifications that are received in the
      // background (Web app is closed or not in browser focus) then you should
      // implement this optional method.
      // [START background_handler]
      messaging.setBackgroundMessageHandler(function(payload) {
        console.log('[firebase-messaging-sw.js] Received background message ', payload);
        // Customize notification here
        const notificationTitle = payload.notification.title;
        const notificationOptions = {
          body: payload.notification.body,
          
        };
      
        return self.registration.showNotification(notificationTitle,
            notificationOptions);
      });
      
      • this file is responsible to receive the messages from fcm and shows the notification information
  • Send Push notifications to client
    • Curl request on the server side:   
      curl "https://fcm.googleapis.com/fcm/send" --request POST --header "Authorization: key=server_key" --header "Content-Type: application/json" -d "{\"to\":\"client_token\"}"
      
      Example: URL:fcm.googleapis.com/fcm/send
      method: POST
      Authorization:key=AIzaSyDJK8dkx_7-7RdJ3YsIg_ueGFnPgOGQD0k
      {
      "notification": {
      "title": "Portugal vs. Denmark",
      "body": "5 to 1",
      "icon": "firebase-icon.png",
      "click_action": "http://localhost:8081"
      },
      "registration_ids":["eBdhRIGunJk:APA91bFVvA9XMJoXrKrgvY57wiY4tIsYJFLjW5AjgZOIZ-dRDIDxkM87eCEokvRW9jk01kyFN-
      ypGYTQ_PymwbAglwS00tQqrKiG1ex29V_Uplje7dbqV988MuyifJ1zBAesHGI0vger","coWde0lMz-Q:APA91bFZB9MRqO04ZOfk80VV8WAnmDng7_NPTPDGP2Bi0PbVhPPOT-
      Nr7vfmLiDDLA1N9Y-wAYv0pGDgKImKoN1uVgCQ_2uAfVexo0wM8UEs7tY8UNNXnZjSdzEK67XSlB8o6TIZQs0G"]
      }
  • Reference youtube url  Getting Started with Firebase Cloud Messaging on the Web - Firecasts